


Geologyhound
Well-known member
Literally, an ice cream scoop…
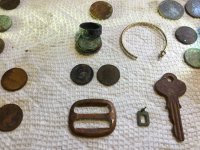
I can’t complain. I went to a “new to me“ local beach. Judging by the parallel tire (equipment) tracks back and forth, lack of foot prints, and cut roots at the edges, the local park had just graded the beach. For some reason, they graded it in a washboard pattern with ridges a foot and a half high and about 4-5 feet wide perpendicular to the shoreline. At the top of the beach, the sand was only an inch or so thick over the top of the gray to black clay. I am guessing they removed about 6 inches of material at least along the edges.
I made one pass close to the shoreline and didn’t find much until I got to the end where I found a wheat penny on the high side in the clay. That got my attention. So I started gridding that end and didn’t find much more until I hit a patch of nails at the grass line. I switched to Tekkna on my D2 and started pulling wheat penny after wheat penny from the nails. They were between about two and six inches into the clay. I was able to find them either along the upper edge of the beach or in the base of each trough. One wheat penny was actually sitting on the top of a ridge about 1 inch down in the sand. I figured the plow must’ve caught the clay and flipped that one out.
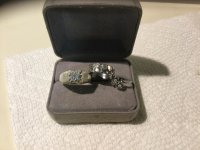
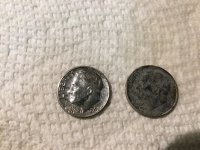
With all the wheats (16 total), I figured there had to be silver somewhere. Sure enough, I found a 1960 Rosie and then a 1957. Then I hit a good quarter reading and was hoping for a silver quarter but instead up came a black ring. It is stamped “STERLING” and was right next to the 1951 nickel. That made it a 3-silver day! A one silver day is good in my book. So, maybe I really did get the scoop on things.

As one final surprise, I was looking the pennies over when I got home. I figured they were all 40s and 50s from what I had seen in the field. However where one of the fours should be was actually a one - a 1915! So there may be some older stuff out there too.
What does anybody use to clean that layer of black tarnish off silver?


")